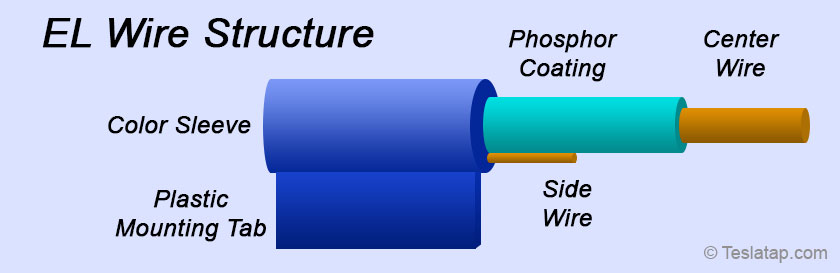
Often called EL wire, Electroluminescent lighting uses phosphor coated wire, with an adjacent wire, under a colored plastic coating.
A small inverter converts low voltage, 5 or 12 volts depending on the model, to AC. The two wires are fed this very low current AC source of about 20 volts at 6 kHz. The inverter can light up to 16 feet of EL wire and uses about 1W per 5 feet of wire (a trivial amount).
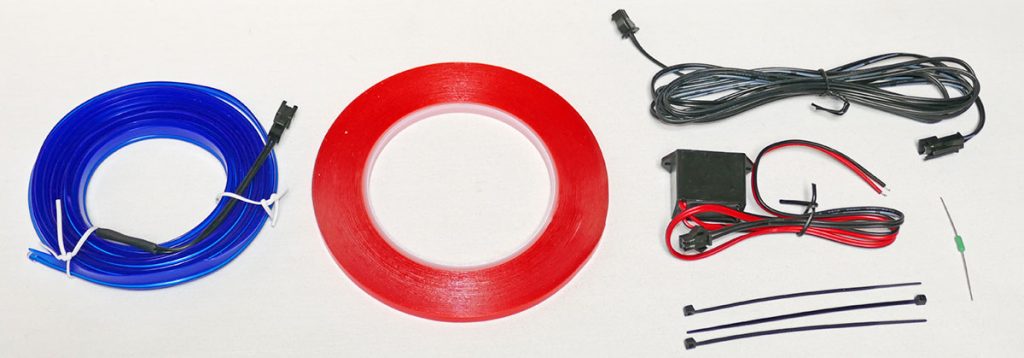
Kits typically include multiple EL wires, a splitter to connect multiple EL wires, and a USB inverter.
Parts
Here are the parts we used for our installation on a 2022 Model S. You can modify this to fit your needs and vehicle.
2 – EL Wires, 23″ of visible illumination (cut from longer lengths)
2 – Extension wires
Epoxy (to seal cut ends)
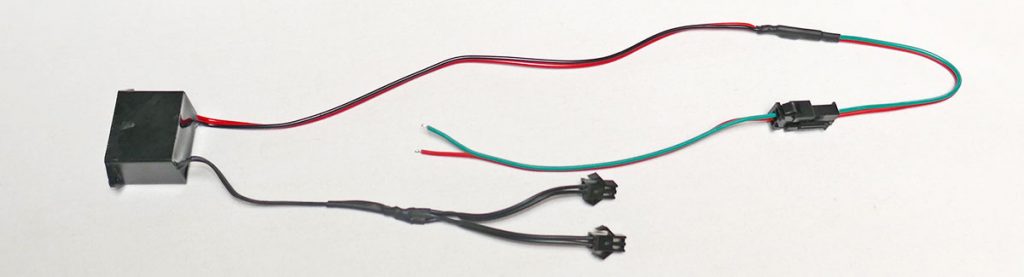
EL Inverter, 12v (5v USB inverters also available)
We started with this EL Wire kit from Amazon. There are many other colors, kits, and vendors. See notes below before ordering!
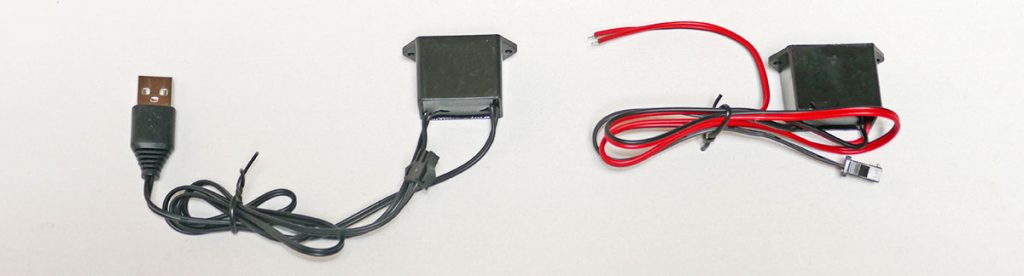
Most will want to use the 5v USB inverter (shown on left below), as no soldering is required. We elected to use a 12v inverter, which requires some soldering and needs a fuse. Most kits include the USB inverter. When using the USB inverter, on newer cars, you may need a USB-A to USB-C cable. Instead, you can buy a low-cost 12v power socket that offers USB-A power.
Installation
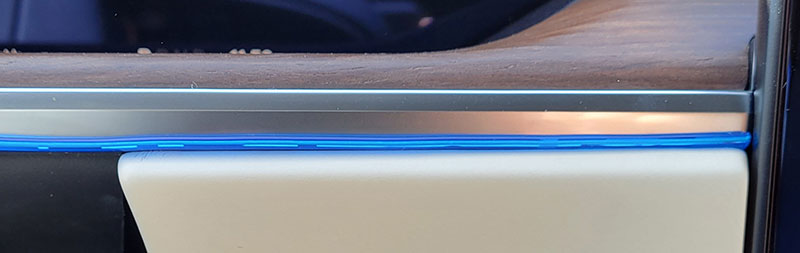
Installation of the EL wire is fairly easy. On the S/X/3/Y left side, there is a section above the steering column that has no adjacent panel below the chrome strip. You could install two short sections, but we elected to go straight across and use some double-sided tape to hold it in place. For the 3/Y this is a curved area and may be more difficult to wrap around. It may be better to use two short EL wires.
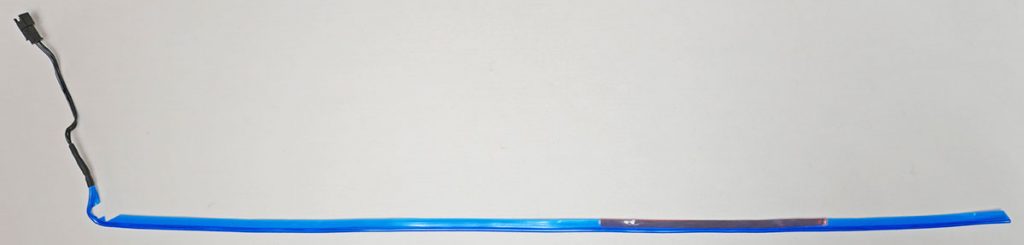
We prepared the left-side EL wire with an extra inch beyond the front portion that will wrap around the side. This is 23″ for the Model S Plaid and does not include the shrink-wrapped electrical connection. We put a small dab of epoxy on the cut end to seal the wire. We also trimmed the tab where it will wrap around the edge. Lastly, we added the double-sided tape to the area where it will attach above the steering column.
For our 12v inverter, we soldered in our fuse in line with the 12v side of the inverter power and added a connector for easy removal. We also soldered two connectors on the AC side (black wires). None of this is required if you use the USB inverter and a splitter. We wrapped the black inverter with some felt to reduce the chances of rattles (not shown).
This video shows our installation on the left side. The right side is similar, although no tape is needed.
The double-sided adhesive is not enough to hold the EL wire in place above the steering column when the cabin gets hot. We added a 7″ thin metal strip, that we painted black, below the EL wire. It is held in place by the two side panels.
Once the EL wire is installed and before the dash side panels are reinstalled, we connected the EL wire to an extension wire and feed it down the side behind the carpet.
On the Model S/X LR/Plaid the under dash panels are held on magnetically and are fairly easy to remove. Other cars may require one or two screws to be removed before the panel can be removed. Once the bottom dash panel is removed, feed the wire behind the carpet over to the center console. Make sure the wires can’t get tangled with the brake or accelerator pedals.
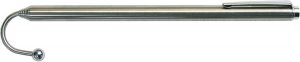
We then fed the wire up the center console, which is not all that easy. The S/X LR/Plaid’s phone chargers lift up and forward to gain access to this area. Use a wire reacher or an unbent coat hanger with a hook that is at least 18″ long.
There are slots on each side of the console where you can slip the wire reacher and hook the wire and pull it up into the area under the wireless phone chargers.
There is space for the EL inverter and wire. We connected it to the center console phone charger connector with a Power tap, which provides switched power. See our Accessory Power Guide for more options, videos, and places to connect for different models. For a USB connection instead of 12v, a USB cable can be fed into the back of the center console (at least on the S/X LR/Plaid). It’s not easy but no cuts are required. Finally, confirm that your wires do not hang up the ability of the sliding lid to open and close.
Test that the EL wires light up. When you are satisfied it is working, snap the inductive phone charger module back in, and reattach the lower dash panels.
Notes
When the EL wire is powered at night, it looks great. During the day, the illumination is not visible, but you still see the colored plastic. We noticed the design of one vendor’s EL wire we bought, the wire shows an inconsistent reflection from portions installed on the left side. Perhaps many would not notice it. The EL wire is unsymmetrical, and it looks better when installed in one direction than with the flip side in daylight. This was branded as LEDCARE/QVEVDACAR shown below in daylight. We bought a second strip from a different vendor (see parts list) that doesn’t show this problem and replaced it on the left side. At night we then noticed the two sides were slightly different brightness! Best to use the same vendor for all your EL wire. We replaced the right side with the recommended vendor and now it looks both consistent and great!
When you buy your EL wire, you should test it before installation to be sure it works and the color is what you expect. We also bought some amber EL wire, and when off it looks amber, but when turned on has a weird yellow-green illumination.
The power required by the EL wire is trivial and will not have any effect on your range.
Behind the Scenes
Like a lot of projects, it took quite a few iterations to get it the way we wanted. For the left side:
Installed a short length that did not extend past the steering wheel gap.
Concluded it would look better extending over the entire left side. Cut and installed a 2nd version with double-stick Scotch tape. The tape didn’t hold.
Removed and switched to a high-tack 5mm double-sided tape, which is the video version.
Noticed a strange appearance in daylight and removed and installed an alternate vendor’s EL wire to eliminate that problem.
After several weeks, the EL wire was sagging as the new double-sided tape was not working well. Inserted a thin metal strip to eliminate the sagging.
For the right side:
This first version worked quite well.
Removed EL wire and sealed the cut end with epoxy, which I should have done at the start. Installed again.
After replacing the other side with a different vendor, the right side was noticeably dimmer than the left side. Removed and replaced with EL wire from the same vendor as the left.