This project is for the classic Model S, before the refresh!
While our first Frunk lighting project works great, it can’t be installed on AWD cars since there is no ‘microwave’ cubby. For RWD cars, when the cubby fills up it also doesn’t help with other items piled into the frunk. This project mounts a strip of LED lighting on the hood to shine down into the frunk. It’s perfect for AWD cars as well as a nice addition to RWD cars. See the bottom of this post for an alternative solution that is easier, but problematic.
The project takes about 60 minutes and the cost of the parts is under $40. You may want to read through all the instructions to see if you feel up to doing this project. Also, note that most of the project resides in ‘wet’ areas where rain and spray may hit the wires and LEDs.
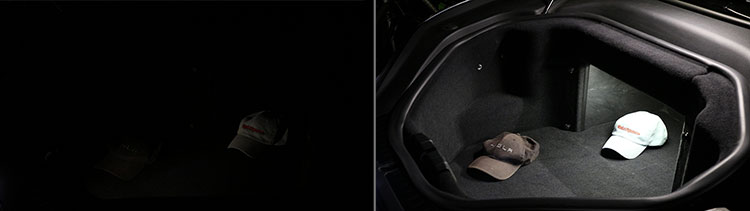
Before and After Frunk Lighting
These two photos of the same objects were taken in dark, no flash, manual camera settings, and no photoshop adjustments. The left shows the standard Tesla lighting, while the right shows lighting with both cubby and hood lighting.
If you’ve already installed one of our other LED lighting strip projects for the frunk or trunk, you may have almost everything you need with the excess parts from those projects. This project does have a few challenges especially connecting to the existing frunk light connections. For my installation, I used two CCTV power cables to make it easier to install, test and allow Tesla servicing to disconnect it if needed. In hindsight, it is easier to just run a wire without connectors, since the connectors need to be sealed from moisture (with heat-shrink tubing).
Parts List
1 Twelve-inch length of 5050 warm white LEDs waterproof, 60 LEDs/m, 12 VDC (cut from a long strip). There are many vendors, lengths, LED density and color choices at Amazon and eBay. You can cut LED strip as marked to the desired lengths. Tesla uses cool white (about 5000K) LEDs, but I find the warm LEDs to look better (about 3000K). There is not a huge difference and its only a personal preference which shade of white you use. Often the images for lit warm white LEDs shown on Amazon and eBay are misleading and appear very yellow. Warm white at 3000K looks more blue-white and does not look yellowish.
2 Solderless Wire Quick Splice Connectors – 18-22 Gauge
1 Assorted heat shrink tubing as needed (marine style to seal the connection to LEDs and connectors)
Option 1 – using connectors
2 6′ Male 2.1mm Plug to Female 2.1mm Jack CCTV Power Cable – We’ll cut one to provide the wire and a barrel connector pair and use the second one to cover the distance (about 12 ft total).
1 ft of 2-conductor stranded wire 18-22 AWG
Option 2 – using direct wire
15 ft of 2-conductor stranded wire, 18 to 22 AWG (do not use solid wire)
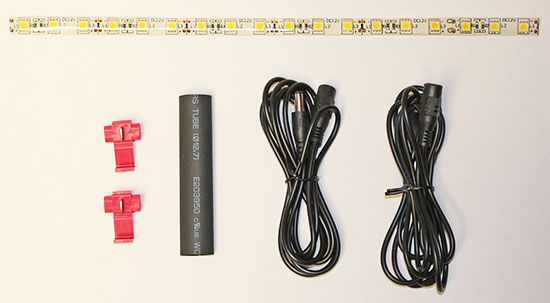
Cut LED strip, solderless connectors, heat shrink tubing, power cables
Recommended Tools
Soldering iron, Pliers (to close the solderless connectors), 24-Inch Pickup Tool with LED
(optional, strongly recommended), drill and 1/4″ drill bit (optional), wire strippers, heat gun (or lighter) to shrink tubing, automotive plastic pry tools (optional).

24″ Flexible Pickup Tool with LED light
Preparation
First cut the power cable, with the male end having about 28″ of length. With this connector portion, you’ll need to connect the wires and connector to the LED strip. You should have a quality soldering iron, design for electronics work. First, carefully remove the silicone waterproof coating from the top of the LED strip about 1/8 from the end of the strip (where you should see two tiny copper connection points. You need to remove all the silicone coating from the copper to enable soldering to it. Solder the red or white marked connector wire to the + dot on the LED strip and the black wire to the – dot. If you make a mess of it, just cut another 12″ LED strip and try again. You should have lots to work with. Slide a 1/2″ diameter marine heat shrink tubing over the connection and shrink to fit. We recommend marine tubing as it makes a watertight seal when shrunk. While still hot press the tubing down on the wires to make a good seal.

LED strip with connector
Next, we need to connect a 12″ length of 18-22 AWG wires to the other end of the cut power cable. Before soldering, slip 1/2″ or so of heat shrink tubing over each wire, so after soldering, the tubes can be slipped over the joints and shrunk. Solder the new connections, slip and shrink the tubing over each wire and shrink the tubing. I then added a larger heat shrink tube over the entire connection and shrunk it as well.
Disassembly
Remove the bottom frunk carpet liner.
Remove the driver ‘s side plastic cover by first unscrewing the rubber bumper. Left the cover out starting at the windshield. When finally removed, a small clip at the very front often falls out. it snaps back into the cover.
Remove the nosecone. There are four plastic clips on the bottom that unclip first from the hex grill, using a thin plastic blade.
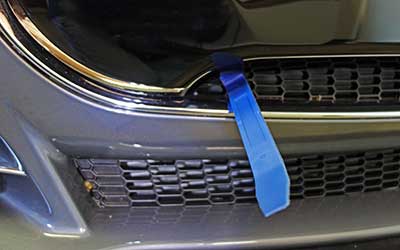
Using a plastic tool to release clips
With these loose, then just pull out starting at the bottom and the other clips around the sides and top should release. Be careful with this part as it scratches fairly easily. If you have parking sensors, disconnect the sensors and put the nosecone aside where it will not get scratched (i.e. not face down on a cement floor).
Carefully remove the plastic frunk-latch cover that holds the existing LED light and trunk release button. It slides straight up (there are two press-fit plastic screws in the front that should lift out as you pull the assembly up. Do not lose these black plastic screws! There are wires attached so don’t pull to hard – it only needs to move up about one inch to release. At this point other than the wires it should be completely loose. You should then have enough room to get in and disconnect the two wires from the Tesla LED assembly. You have to depress the connector locking tab before sliding the connector out. You can leave the frunk release button wires attached. Lay the panel on the frunk bottom for now.
Installation
The LED strip will be mounted on the hood just below the thick water-seal towards the windshield. This location is ideal, as it provides the perfect spot to illuminate the frunk without being visible when standing in front of the car. Before attaching, feed the wire behind the felt shield over toward the driver’s side hood hinge. Remove the LED backing tape, center, and press into the felt backing.

The underside of Hood LED mounting
Connect the 6ft extension cable to the connector from the LED. Route the wire along the black washer line down the hinge to the fender. Then route the wire inside the fender to near the back of the headlight. Position the wire such that it cannot be sliced by the trunk hinge and is not too tight so opening and closing of the frunk does not pull on the wire. With the placement about right, remove the connector and cover the connector with some marine heat shrink tubing, reconnect and seal the connector. This makes it waterproof. Use several small tie-wraps to secure the wire to the washer line without crimping the line. Install an adhesive tab under the fender where another tie-wrap can hold the wire in place.
Move to the frunk release switch area.
Option A: Drill a 1/4″ hole at the bottom plastic near the driver’s side (see photo below). Our wires will pass through this hole. It’s at the bottom, so any moisture in this area drains through the bottom.
Option B: Tesla’s wires pass through a grommet on the side. It might be possible to pass our wires through this grommet (although it looks really hard). I did not attempt it but might avoid drilling a hole.
Now for the hardest part of this project – getting the wires to this hole. You may have noticed the well bottom is at a very inaccessible location. I’m sure there are a number of ways to do this, but I’ll explain what I did. Take 6 ft of string, and tied a 1″ loop at one end. Poke the loop through the hole from the top. Now you need to hook this string from the front of the car. I used the 24″ pickup tool from the front to hook the loop. You might also fashion a 3 ft length of solid wire with a small hook to grab the string. Pull the string out about 3 ft.
Attach the connector with the pair of wires to the string with electrical tape. On the other side of the string, pull the wire up through the hole (but make sure you still have access to the connector side at the front of the car.
Looking at the two wires from the Tesla LED assembly, there may be some wrapped electrical tape around the wires. You’ll need to remove some of this to leave 2″ of wire uncovered so we have room for the wireless connectors. If cutting it the tape off, be very careful, as you don’t want to nick the wires. Next using the wireless connectors, connect the red or white wire to the red Tesla wire, and the black wire to the black Tesla wire. Leave at least 1/2″ of wire as shown before the black Tesla LED connector, or the connector will not fit back on the LED assembly!
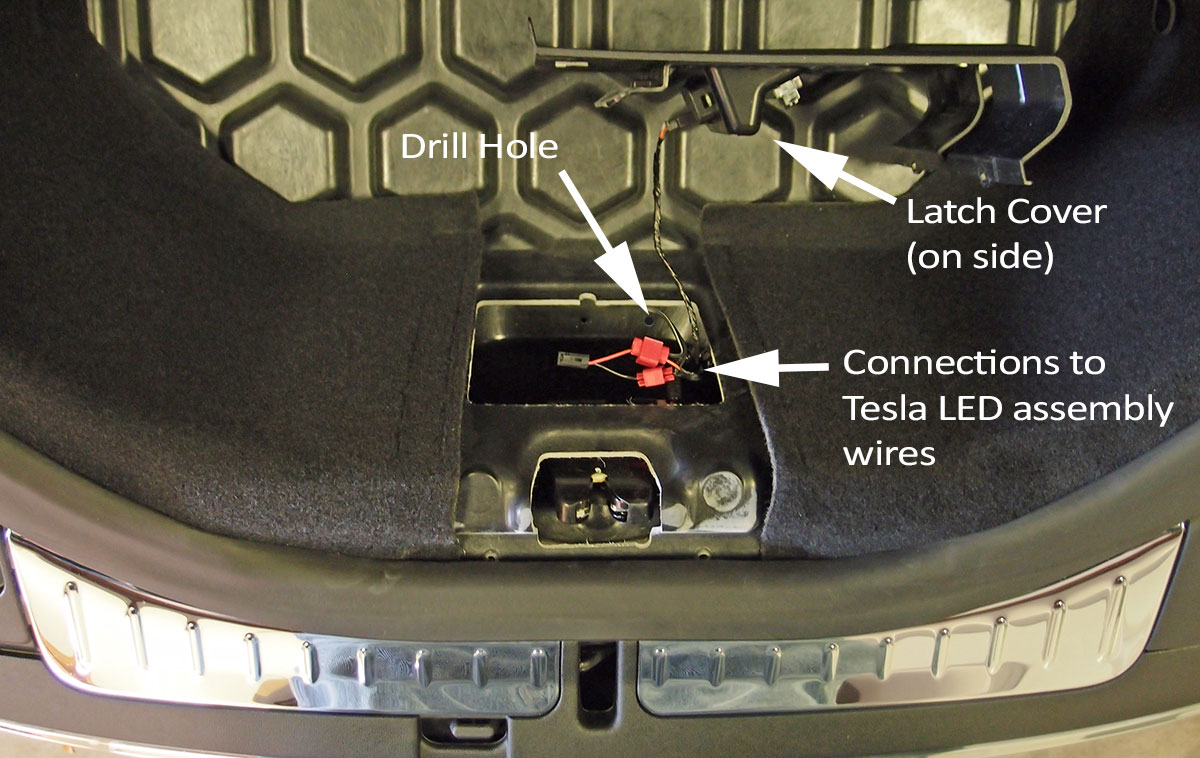
Frunk panel hole and wiring
The final connection is also a bit tricky. We need to pull the connector end from the front up behind the headlight. There is very little clearance here, so I used my handy pickup tool again. With the two connectors near each other, slip some marine heat shrink tubing over the connectors and connect them up. Using a heat gun, shrink the tubing to make a watertight connection.
Time for a test. Reconnect the Tesla LED assembly to the black connector. By now the frunk light has likely turned off, which is normal. Close the frunk and re-open it. The Tesla LED should be on. Look at the LED strip to confirm it is lit!
Troubleshooting – If the new LED strip does not light, either a poor connection was made, or the polarity is reversed. Pull lightly on your new wires attached to the red quick-connectors. If you didn’t push the wire fully in before clamping it closed, it may pull right out indicating a bad connection. If so, redo the connection (it splits apart easily). If the connections seem good, verify the polarity by checking the wire colors and/or using a meter up at the connector near the LED strip. Rewire as needed.
With the confirmation of the LED strip working, reattach the frunk-latch cover. Hook the bottom one and put it back into place. Push in the two plastic press-fit screws to hold in the top. Attach the plastic side cover and screw in the rubber bumper until it stops.
Enjoy your new lights! The lights are only on when the frunk is open, so they have no effect on the range. The light strip used here consumes less than 5W when on.
Thanks go to Robert Rosenbloom, from whom I got the idea for this project.
Alternatives
Others have suggested just sticking a Motion Sensor LED Battery Powered LED strip on the hood. This is an easy solution but has some problems. The AAA batteries may be dead when you need it. The temperature extremes in this area are not good for AAA batteries and is not recommended for wet or freezing areas. In addition, while driving, any objects that move in the frunk area may trigger the motion sensor and quickly run down the batteries. To access the battery compartment, you’ll need to remove it to install new batteries and then apply new adhesive tape to hold it in place. Lastly, the unit may not remain attached under vibration and heat. Being so cheap and easy, it still may be worth a try.