Most Teslas have two or four footlights – two in the front (S/X/3), and in the Model S, two under the front seats angled to the rear floor. These lights are rather dim and barely noticeable on black carpets. Depending on when the car was purchased and if some options were not purchased, your vehicle may be missing these lights. This project updates/adds footlights with brighter LEDs. (Jul-2025 update)
- Option 1: Modify your existing Tesla footlights with brighter LEDs. This requires some soldering and may not be ideal for most owners, but it does allow you to choose the color/tint. The modification takes about 5 minutes per light.
- Option 2: Buy a set of new, brighter lights from Abstract Ocean. These are direct replacements, but far brighter than the Tesla originals. An excellent choice, but the white is a very cool blue-white.
- Option 3: If you don’t have the lights, you can also buy new ones from Tesla or Abstract Ocean. For Tesla, order part number 1007151-00. The rear footlights on the Model S require a mounting bracket under each seat. The Abstract Ocean bracket sells for $5 each. The bracket has changed for the newest premium seats (after about April 2017), but the old bracket may be preferred (see instructions below). Two are needed, if they are missing or if you want to replace the downward-facing ones in premium seats.

If you’ve purchased any LED lights for your house, they typically come in three colors – Warm White (about 2700K), Soft White (about 3000-3500K), and Bright White (4000-6000K). There is no standard for these labels, like warm or cool, so they tend to vary a lot between manufacturers and the phase of the moon. The color temperature is an industry specification that is far more accurate. The lower temperatures of 2600-2700K are closest to incandescent light. On the other end, color temperatures of 4000-6000K have a very blue tint and poor color rendition (i.e., objects under this light have poor color tone).
While I don’t have color measurement tools, I estimate the current Tesla footlights are close to 3500K. Older cars may use a higher color temperature. The Abstract Ocean lights also use high color temperature, perhaps close to 5000K. We wanted something a bit warmer and made our modifications with super warm white LEDs that I happen to already have, around 2700K. These may be too “warm” for some, and around 3000K could be ideal.
If you want to replace the LED yourself (option 1), you can choose the color temperature or even switch to a different color, such as green or blue LEDs. There are a lot of sources for these light strips. The key requirements are 12V, 3 LEDs per inch (same as 600 LEDs in a 16.4 ft / 5m strip), high brightness, and adhesive-backed. You do not want waterproof versions. One strip can supply 200 modules, but you can use the excess strip for other projects too. We have not tested the Amazon products listed.
| Color | SMD (LED type) | Where to buy |
|---|---|---|
| White – 2700K | 2835 | eBay* ($58, CD-2835-F12-SWW2) |
| White – 3000K | 2835 | eBay* ($58, CD-2835-F12-WW2) |
| White – 6000K | 2835 | Amazon ($14) |
| White – 3000K | 2835 | Amazon ($15) |
| Red | 3528 | Amazon ($25) |
| Blue | 3528 | Amazon ($25) |
* Product we used from ColorDiode.com via eBay – very bright, long-lasting; Could not find a listing as of this writing, but do a search on eBay for that part number. Costly, but very good quality and brightness.
Use a plastic pry tool or a small screwdriver on the indented side of the module to pry it out of the mounting. In the photo above, the indent is on the left side. They can require some effort to snap out of the hole.
A locking tab must be released while pulling out the connector from the black housing. The lock is where the wires exit the connector. Push down towards the wires to unlock, and while holding it down, slide the connector out from the module. I recommend you have a bright light while you do this work. Some connectors are so tight that you may need to pry them apart with a screwdriver while holding the tab down. It’s a bit tricky the first time, but it gets easier once you get the hang of it.
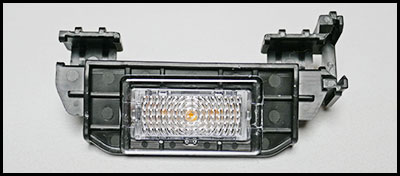
First, move the front seats fully forward and up to their highest position to provide better access under the seats. Move yourself to the floor of the rear seat area. Under the front seat, you should see the LED module in a black plastic bracket.
The bracket has changed over time. The original bracket was used from the start through NexGen seats. Premium seats use a different bracket that points the lights down.
The original plastic bracket that snaps onto a round bar. The bracket on the premium seat is screwed onto the seat mechanism. The modules are almost impossible to remove from this bracket without breaking the module. We recommend you pull the bracket from the bar and disconnect the connector to the module (see instructions above).
Now you can try to remove the module from the bracket, but they are really wedged in tight. I found it is far easier to swap the “guts” of the LED module and leave the clear lens attached to the bracket. See the next steps on “Disassembly” for removing the black electronics portion of the LED module. You can then modify it with the rest of the instructions or disassemble an Abstract Ocean LED module and snap the black electronics into the clear lens/bracket assembly.
For those with the premium seats that point the LED modules downwards, a good fix appears to be to remove the bracket (two screws) and replace it with the old-style bracket. It can be attached with a couple of tie wraps. Check these in-progress photos of going this route from our friend BigD0g. This allows you to point the LED module back at the carpet rather than down. Some adjustments may be necessary to ensure the lowest seat position doesn’t hit the top of the bracket.
For front footwell LEDs, if you are not going to replace the LEDs within the module, skip this step.
You’ll need a small screwdriver and two paper clips that are partly unbent.
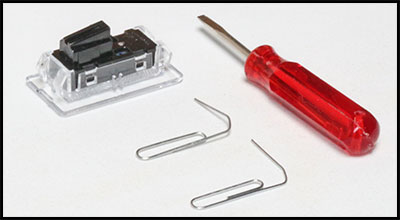
You’ll insert the screwdriver the side above the square hole to release and pry up the black housing. Do this on both holes on one side. Insert the two paperclips in the slots so that the housing will not pop back into place. Switch to the other side and release and pry up the two locations until the black housing is released from the clear lens.
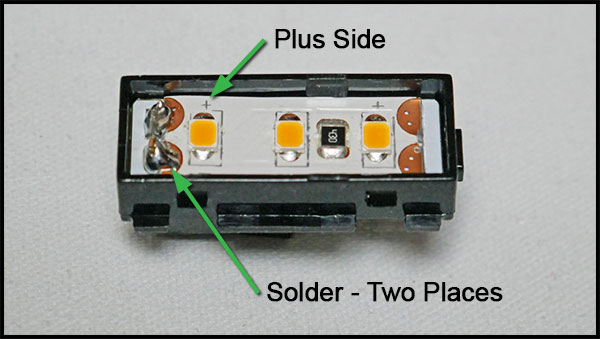
Break off the LED (center) and the black current limiter using long-nose pliers.
Use a soldering iron to smooth out the pads. The LED often leaves behind two tiny metal “sides” that should be removed with a soldering iron. There should be a minimum of protuberances when done.
On the LED tape you purchased, if there are wires attached, cut off a portion of the LEDs at the next cut point (we will not use this part). Cut a 1″ section at the next cut-off point. You should have 3 LEDs in this section and exposed half-pads on each side of the strip.
Peel the backing tape off and insert it into the black LED module so that the “+” side of the strip is up, and it is as close to the connector pins as possible. Solder the connector pins to the LED tape pads with solder. Be careful not to melt the LED or the black housing.
With the completed assembly, snap the housing onto the clear lens. Note that it only fits one way.
We took photos of the passenger side footwell, using the standard Tesla black carpet. The camera shots were taken in full manual mode to maintain identical settings for each image. Other than cropping and positioning, no Photoshop tweaks were done to the images either.
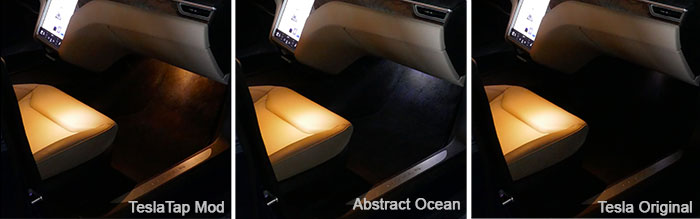
Using Tan carpets makes the lights really shine! Carpets are Ultimat 600 Tan, and look great with the TeslaTap modified LED modules.

The original Tesla LEDs use about 18 mA. Our modified LEDs take about 66 mA, and we measured the Abstract Ocean LEDs at 70 mA. All of these are negligible amounts that will have zero effect on the range. Keep in mind these lights are only on when a door is open, and if the door is left open for more than about 30 seconds, Tesla turns the footwell lights off.
There are a total of 17 LED modules in the Model S and 12 in the Model X, as follows:
- 1 – Frunk Light
- 1 – Glove Box Light (almost impossible to remove)
- 2 – Front Footwells Lights
- 2 – Rear Footwells Lights (Model S only)
- 4 – Under Door Puddle Lights (2 in Model X)
- 4 – Side Door Warning Lights (red)
- 2 – Rear Trunk, Inside Left and Right (Model S) or Left only (Model X)
- 1 – Rear Hatch Light
Model 3 has the following lights:
- 2 – Front Footwell lights (disabled on SR/SR+)
- 4 – Under Door Puddle Lights
- 4 – Side Door Warning Lights (red)
- 1 – Glove Box Light
- 2 – Rear Trunk Lights
Any or all of these can be upgraded depending on your budget and time! Note that the LED modules mounted on the Model S door in newer cars are exceptionally tight. I found it was necessary to pull off the door panel (3 bolts and a bunch of very hard snaps). You can then access the back of the LED module. I used diagonals to cut the two clear plastic tabs on one side that lock it in place.