While many states do not require a front plate, some make it optional, and some require a front license plate on all vehicles. This project changes the front plate holder to attach magnetically onto a hidden steel strap. The front plate holder can then be attached or removed at will without any tools. These instructions are easy to modify based on parts and tools you may have on hand.
Also, see our other modification magnetic plate project for the Classic Model S.
- Provide better aerodynamics when not attached
- You hate the look of the front plate protrusion
- Don’t like to advertise your state more than required
- Sometimes you need a front plate, to avoid tickets when using public parking lots or being nabbed by ticket-happy cities
This is the hardest part of the project. It is held on with two security screws on the bottom, and a very strong adhesive on the front of the bumper. The good news is once removed, there are no visible holes.
To remove the two security screws, you need either a special adapter that another owner created using a 3D printer or some special bent long-nose plyers. We tried normal long-nose plyers without success. You really need one of these two tools. These screws are normal thread, but since they are upside down, don’t get confused as to which way to turn to pull them out.
Next, you need to pull the plate from one side away from the car. A few owners had success with this, but perhaps I’m not as strong. The bond is very strong. I also tried a heat gun, and it didn’t help at all. My solution was to use a thin plastic dinner knife. While pulling on one side of the holder, insert the knife and cut the foam tape. Be careful to not nick the bumper paint. Sawing away and pulling at the same time, I was finally able to get it off!
Remove the adhesive residue from the bumper. You can just rub it with a finger to ball it up and pull it off. Any minor remaining adhesive can be removed with goo-off or another adhesive remover that is safe for vehicle paint.
Removing the adhesive from the holder is a harder task. With a plastic pry tool, I removed all the foam tape sticking to the back of the holder. I was left with a thin gunky coating. Goo-off didn’t make a dent in removing this – it is really tough. I concluded it was better to just leave it. I covered the back of the holder adhesive area with thin rubber tape – which works to pad the holder and the bumper when done.
- 2” wide x 36”, .062 thick rubber tape – for the back of the holder and behind the strap
- A galvanized steel strap – 12” x 1-3/8” like Simpson Strong-Tie HRS12
- A black push fastener (to help with alignment), like Hillman 881200
- 2 – 6mm x 25mm stainless steel screws to hold the steel strap to the car
- Loctite threadlocker blue or similar (to secure screws)
- An aluminum bar – 9” x 1” x 1/8” (width is not critical, I used ¾” scrap I already had)
- 2 – Magnets, with 10-24 stud
- 2 – Nylon 10-24 lock nuts, coarse thread
- Optional – black spray paint with primer – for steel strap and aluminum bar
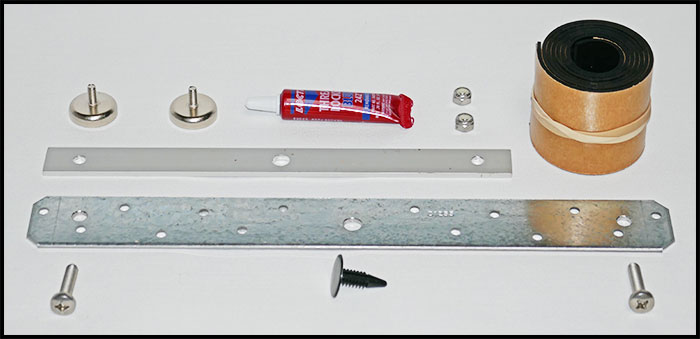
Project Parts (strap and bar holes are already drilled – see next step)
The steel strap needs three holes drilled in it. Drilling the steel strap may require a quality drill bit, preferably carbide tipped. Drill two ¼” holes about 7/8” from each end. You can use the plate holder as a template for these two holes – as they are used to mount the steel plate to the bumper where the plate holder used to connect to the bumper. Drill a 5/16” hole in the center where the push fastener will go. Deburr both sides of each hole.
If the aluminum bar is longer than 9”, cut off a 9” section and file the cut smooth. Drill two 11/64” holes 5/8” from each end of the bar. In the center drill a 5/16” hole. Deburr both sides of each hole.
Using the aluminum bar as a template, clamp it to the edge of the plastic plate holder between the original bottom holes. Drill the same size holes in the plate holder. Next using a fine hand saw, cut off the tabs on each side of the plastic holder.

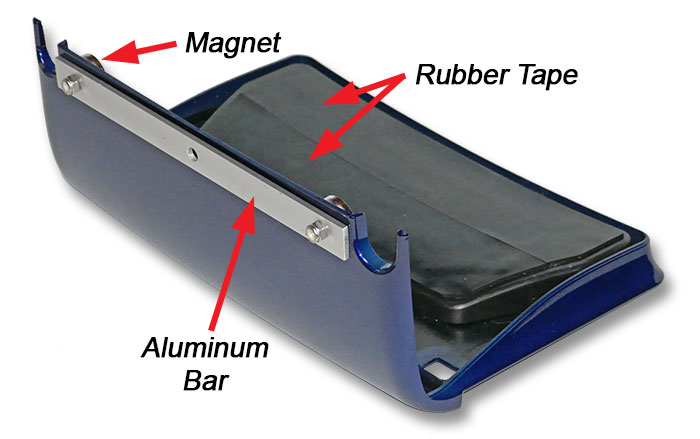
Insert the black push fastener into the center of the steel strap. This provides an alignment guide when attaching and removing the plate to the car. Cover the back of the strap with the rubber tape. This helps avoid any scratches to the bottom of the bumper. Attach the strap to the car with the two stainless steel 6mm screws. This is a dry fit, and we’ll remove it before the final assembly. Do not use Loctite yet.
Moving to the plastic plate holder, if you didn’t attach the rubber tape to the back, do so now. Attach the aluminum bar to the bottom of the holder, insert the magnets through the holder and the bar and secure with the nylon lock nuts (two places).
Time for a test! Using the alignment pin, attach the plate holder. If the pin is too thick, file off some of the sides of the plastic pin so it fits. Pull it apart. Disassemble the aluminum bar, and remove the steel strap from the car. Paint one side of the strap and the bar with black paint (optional) and dry. Be prepared that the black paint may be scraped off when attaching and removing the magnets on the strap. It will not be very noticeable.
Complete the final assembly. Mount the strap to the car. This time use Loctite on the screw threads. Assemble the plate holder and magnets. Test again and you should be good to go!
Results here!