Tesla vehicles have two front USB/Data ports. We’ll show how to add more ports and how to relocate ports to a more secure location. (Jun-2020)
The center console USB ports on most Tesla cars use Type-A. Tesla switched to Type-C for all Model Y cars, and the Model 3 builds after May-2020. On the Model S and X, the main display, MCU, uses mini-B type USB connectors, which feed via cables to the center console.
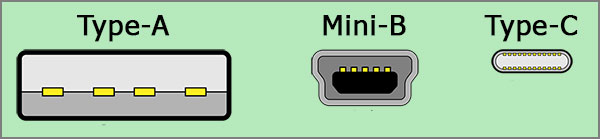
USB Ports used in Tesla vehicles
You may find you’ve run out of front USB ports for all the devices you wish to connect. Some of those devices may include:
- Direct Phone charger
- Wireless phone charger
- Flash drive for music
- Flash drive for the Tesla dashcam
- SSD drive for music and/or the Tesla dashcam
- Dashcam that requires 5v (non-Tesla types)
- Game controller
- Console LED lighting
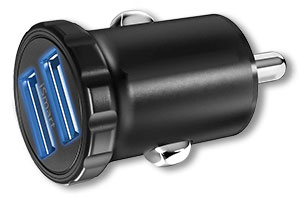
There are at least two ways to get additional ports. For charging, we recommend getting a 12v USB power plug. These are often under $20 and can provide one, two, or more high power USB ports. The ports in the Tesla are USB 2.0 and can supply about 500 mA. Most phones made in the last 4+ years offer fast charging, but you need more current. The 12v USB power plugs are available with 2.4 amps USB ports, which can charge a phone about 5 times faster than the Tesla USB connections. These higher-power USB ports are also best for wireless charging and other high-power needs.
A USB hub allows for the expansion of a single USB port to multiple ports. The most common hubs expand one port to 4 ports, but there are many other sizes. An unpowered hub will split the power from the single port to the other ports. This means you have a maximum of 500 mA spread across 4 ports. For low power devices that can be fine. For a high power device like an SSD drive, it may not be enough. While they make powered hubs, most of these are intended for 120V power but might be adapted to 12v or 5v.

Tesla has some great features on newer vehicles such as Sentry mode with dashcam recording. One concern is during a break-in, a knowledgable thief could easily grab the USB drive that holds all the video of the break-in. One solution is to re-route the drive to another hidden or locked location.
For example, relocating the USB connectors to the glove box would be perfect. The glove box is locked when the car is off, so access is far more difficult, yet access is easy if you have the key. This addresses the issue of a Valet damaging the car and taking the drive, as the glove box is also locked when Valet Mode is active.
There are many ways to accomplish this, and some options are easier than others. We’ll outline several ways to accomplish the move, but you can modify the approach the best fits your needs and effort you wish to expend.
Method 1 – Access the ports on the back of the MCU of the Model S or X
This is the most professional approach, but you’ll likely need to remove much of the dashboard to pull the MCU partly out so you can access the two USB connectors on the back of the MCU. If this is too difficult for you, look at method 2, which is easier. We’ll connect a 4-port hub to each of the MCU USB connections. One hub will connect to the existing two USB port cables that route to the center console. The 2nd hub will connect to two ports mounted in the glovebox.
Parts needed:
- 2 Cables – USB Mini-B Male to USB Type-A Female, 1 foot
- 2 Adapters – USB Type-A Male to USB Mini-B Female
- 2 Hubs – USB 4-port unpowered hub
- 1 Dual cable flush mount USB extension, 3 feet
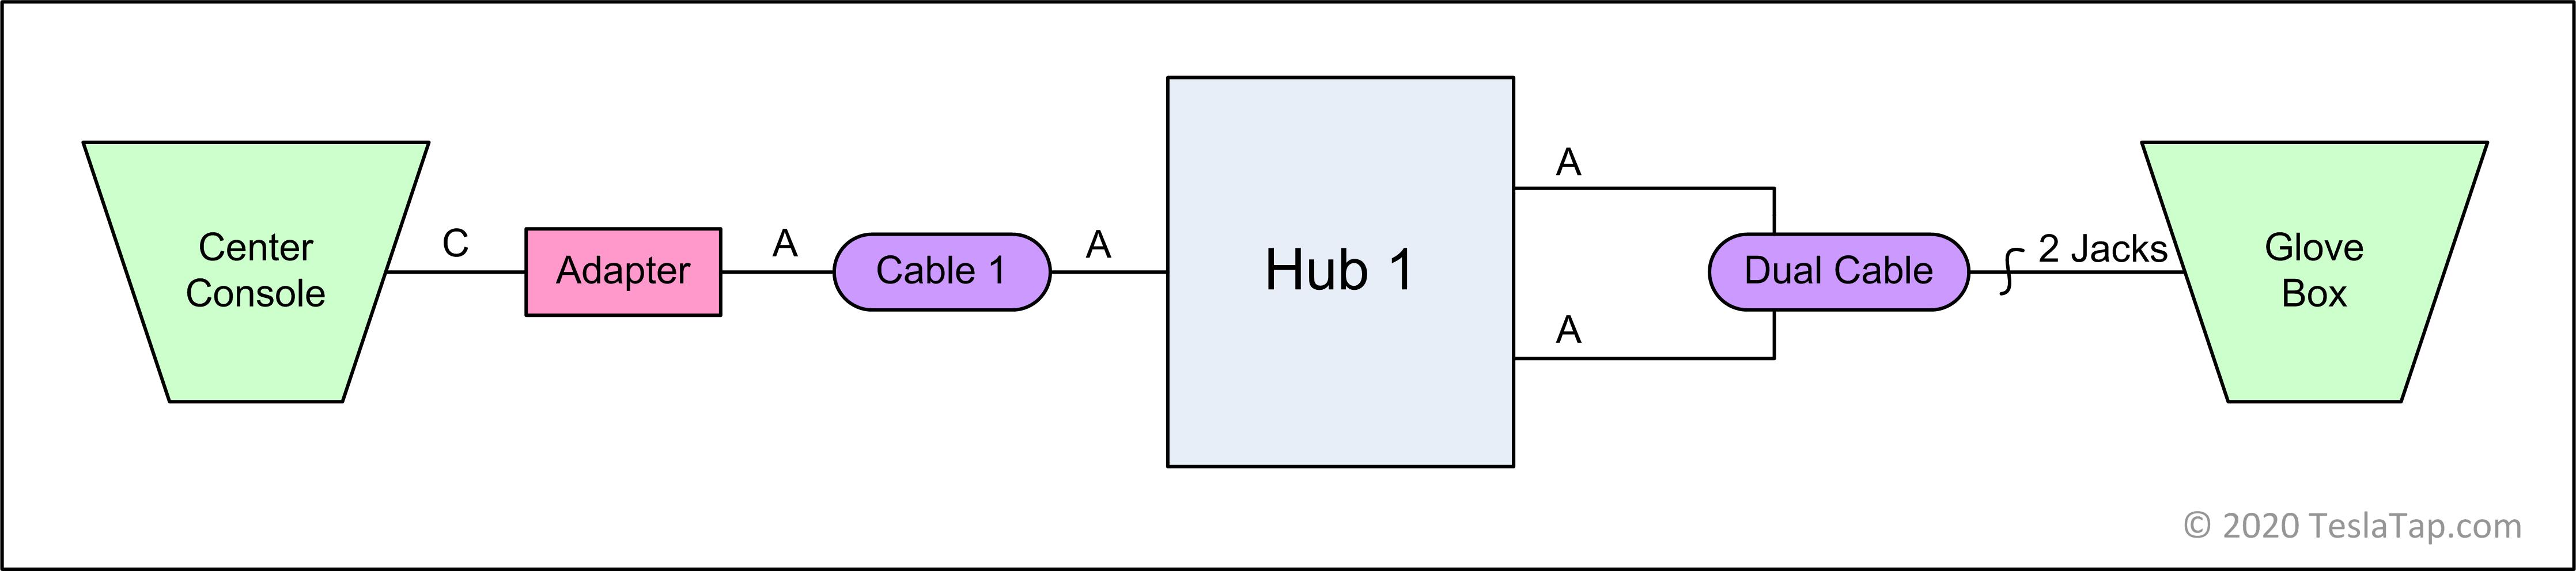
The following diagram shows the cables and connections.
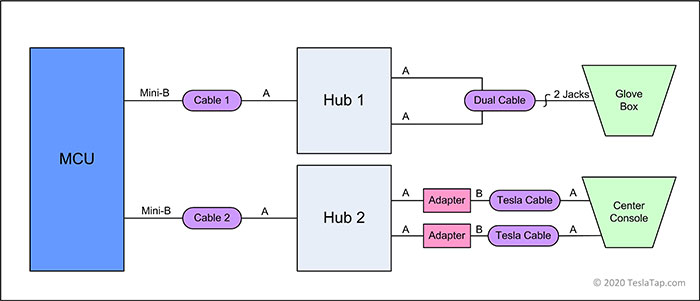
Cable connections
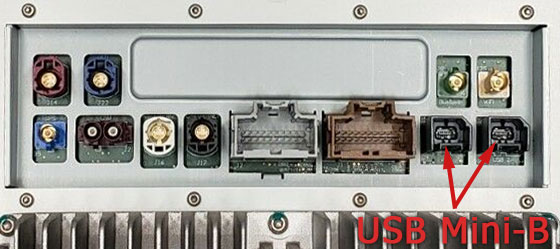
Rear of MCU
Quite a bit of the dashboard must be removed to get access to the MCU. This video on removing MCU1 shows the steps required. MCU1 and MCU2 removal processes are the same. The back connectors have an unusual locking method for the USBs. If you’re using some standard USB cables, it may not fit. You’ll likely need to trim off some of the plastic on the cable’s Type-B connector to fit into the slot in the back of the MCU.
The closest we could find that perfectly matches the connector in the MCU is a cable from TE, Part Number 1557331, that has the right locking connector, but has another Type-B connector on the other end. It’s also not available and is marked obsolete in the catalog.
Method 2 – Connect to the Center Console
In this method, we connect to one center console connections and run the cable to a hub that feeds two ports in the glove box.
Parts needed:
- 1 Cable – USB Type A Male to USB Type-A Female, 3 foot
- 1 Cable – USB Type A Male Right Angle to USB Type-A Female, 6 inches (optional)
- 1 Cable – USB Type C Male to USB Type-A Female adapter (only for Model 3/Y with Type-C USB)
- 2 Adapters – USB Type-A Male to USB Mini-B Female
- 1 Hub – USB 4-port unpowered hub
- 1 Dual cable flush mount USB extension, 3 feet
The following diagram shows the cables and connections for the S/X/3 that uses the larger Type-A USB connectors.

For vehicles with USB Type-A
For the Model S/X, while not necessary, for the Type-A connections, you may want the additional right-angle cable. You remove the console rubber mat and use an existing hole or make a new hole and feed the wire under the area. There is another rubber mat that lifts out along most of the bottom of the console. Remove it and run the 2nd cable under the mat to the rear of the console and feed it out the back.
The next diagram applies to the 3/Y that has the Type-C connectors.
For vehicles with USB Type-C
Thanks go to Akikiki for helping to design this project!