

You can tap into the internal vehicle’s systems to monitor all sorts of data, including battery module temperatures and voltages, battery reserves, and much more. You do this with a cable that connects the diagnostics connector to a Bluetooth ODB-II module. This module feeds the data via Bluetooth to one of several phone apps to display the data. (Oct-2023)
OBD-II
Vehicle manufacturers are required to provide an On-Board Diagnostics port to extract information primarily related to pollution controls in ICE cars. This is referred to as OBD-II.
Many companies make devices that connect to the OBD-II port and can identify engine details and read out various problem codes. The latest generation scanners use Bluetooth to communicate the data to a phone app, that can better explain the data seen.
EVs do not need OBD-II, and on the Model S, Model X and Model Y, while an OBD-II connector is available, there is no useful information that can be extracted from this connector. On the early Model 3 there is no OBD-II connector at all, but may appear in later years.
CAN Bus
Most cars communicate between various electronic modules via the Controller Area Network (CAN bus). In the Tesla, there are multiple CAN buses, because there is so much data, a single CAN bus is not enough. On the Model S and Model X, there are 5 CAN buses. We’ll focus on CAN bus 3 (Vehicle), which has much of the information we want to look at. This includes:
- Chargers
- Charge port
- Drive Inverter -Rear
- Drive Inverter – Front (AWD only)
- DC-DC converter for 12V charging
- HV Battery Management System (BMS)
- Thermal controller and HVAC
The Model 3 and Model Y also has a number of can busses, but rather than numbered, are labeled. The primary three are Vehicle, Chassis, and Party. The Party bus is an alternate for fault tolerance. There are also secondary CAN busses called Private Right, Private Left, Private Rear. We are only interested in the Vehicle bus, which is similar to CAN bus 3 in the Model S/X.
The Diagnostics Connector
The diagnostics connector provides both power and access to the CAN bus of interest. In the Model S and Model X, this is located behind the cubby, below the main display prior to 2021+ LR/Plaid. The 2021+ LR/Plaid has the diagnostics connector behind the dual phone chargers.
To access the connector on older vehicles, you push forcefully down on the cubby until the snaps are released. Just above the cubby, you can get the diagnostics connector, a 20 pin blue connector in the Model X, and refreshed model S. Older pre-refresh Model S uses a 12-pin black connector.
For the 2021+ LR/Plaid, lift up the back of the phone chargers (the back being towards the rear of the vehicle). There are two hard snaps. Pull the module forward a bit. Then snap down the thin black temperature monitoring vent above the front of the phone charger module. The diagnostics connector is attached to this module and can be snapped off of it. I left mine unattached once connected to my cable, but did wrap it in felt to avoid any rattles.
On the Model 3 and Model Y, you can access CAN via a connector in the center pedestal. From the rear seat, there is a black cover near the base of the pedestal. Using a plastic pry tool, and starting at the center seam, pull the cover towards the back of the vehicle. There are five snaps that hold the cover in place.
Behind the cover is a connector. You will need a short “extension” to bridge the connectors we talk about in the next section. Be sure to turn the vehicle off before separating the connectors and inserting the extension that has a tap for power and the Vehicle CAN bus.
The Cable
You can buy a pre-made cable or build your own. The pre-made cables are fairly inexpensive. There are many vendors, so just search for your car’s model and OBD-II cable and you’ll likely get many hits. GPS Tracking is one company that offers all four types of cables. We’ll also provide the pinouts if you wish to make your own.
We only need four wires, used for power, and the CAN bus. The newer blue diagnostic connector is found in all the Model X and the refreshed Model S. The older black connector is in the pre-refreshed Model S. We want CAN bus 3 (Vehicle bus) from the Model S/X.
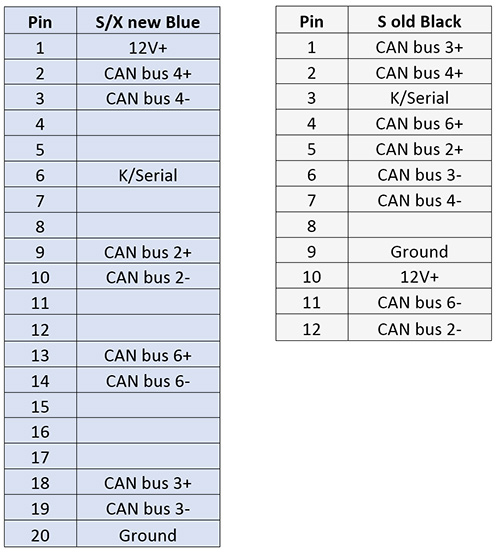
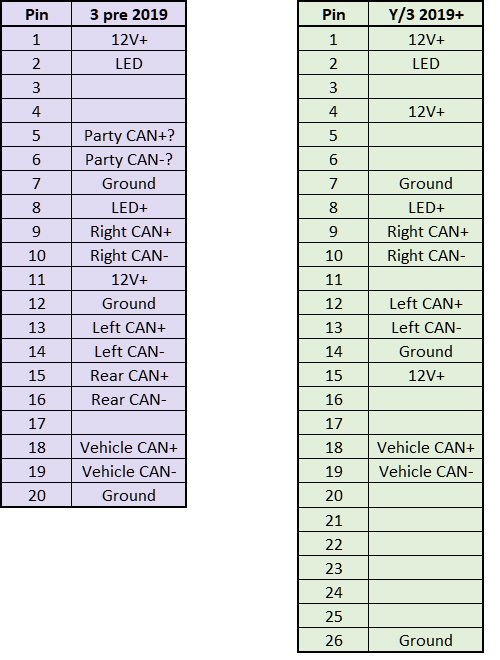
The Model 3 prior to 2019 uses a different 20-pin connector. The wiring for the four needed wires is similar to the S/X. For the Model Y and the Model 3 made in 2019 or later, a new 26-pin connector is used. In both cases, we want the Vehicle CAN on pins 18 and 19.
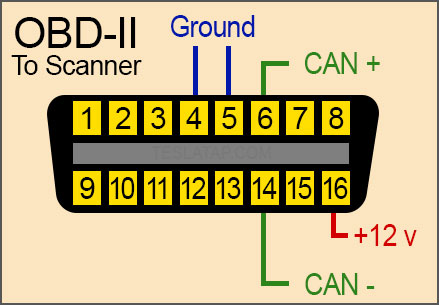
On the other end of the cable is a female OBD-II connector used to attach to an ODB-II scanner. The following shows where the CAN bus connects.
Parts to make your own cable include:
1 – OBD-II female connector with wires
1 – TE Connectivity 173851-2 housing, 12-pin for pre-refresh Model S
4 – TE Connectivity 173630-1, terminals for 12-pin housing
1 – Sumitomo 6098-5622, 20-pin housing for Model X and refresh Model S
4 – Sumitomo 6874 terminals, tin for 20-pin housing
1 – Sumitomo 6098-5613, 20-pin male housing for Model 3, pre-2019.
16 – Sumitomo 8100-3622, male pins for smaller wires in 20-pin housing
4 – Sumitomo 8230-4923, male pins for thicker wires in 20-pin housing
1 – Sumitomo 6098-5622, 20-pin female housing for Model 3, pre-2019.
16 – Sumitomo 8100-3624, female terminals for smaller wires in 20-pin housing
4 – Sumitomo 8240-0214, female terminals for thicker wires in 20-pin housing
Assorted wires as needed
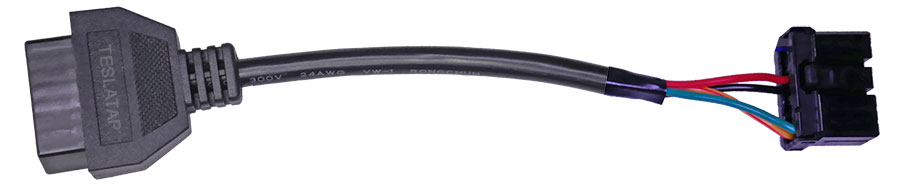
A cable we made for connecting an OBD-II scanner to pre-refersh Model S diagnostics connector.
OBD-II Scanner
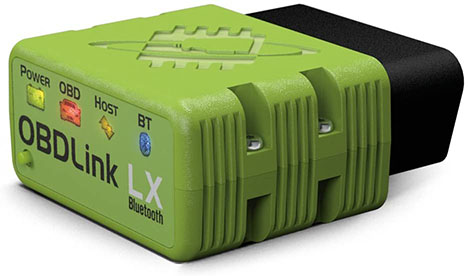
We recommend the OBDLink LX Bluetooth scanner. It’s not the cheapest, but it is fast, which is important due to the amount of data Tesla generates on the CAN bus. OBDLink also makes a more expensive MX version, but we don’t see any benefit for use with Tesla vehicles on Android. One report shows that if you plan to use a device with iOS, you will need the OBDLink MX.
Most of the cheap OBD-II scanners are quite slow and may not keep up with the high amount of data on the CAN bus. You can always try one, but be sure it is compatible with the software app you plan to use. For example, most (all?) Tesla-specific apps we’ve seen are not compatible with Bluetooth LE.
The App
Android Apps
- Scan My Tesla – Offers a range of nice graphics as well as raw data
- TM-Spy – Has not been updated in a while
Apple iOS Apps
- Scan My T3sla – Offers a range of nice graphics as well as raw data.
- TesLAX – Provides good graphics and options to configure
Completion
First, attach the OBD-II scanner module to the OBD-II connector on the cable. Attach the cable to the Tesla diagnostic connector. In the Model 3, it’s important you turn off the car’s power first before inserting your cable between the two diagnostic connectors.
Install the app you elect to use on your phone or tablet. When the app first starts, it will show a list of all Bluetooth devices. Pair with your OBD-II scanner module. For the OBDLink LX, that exact name shows. Once paired, the data should start to load!
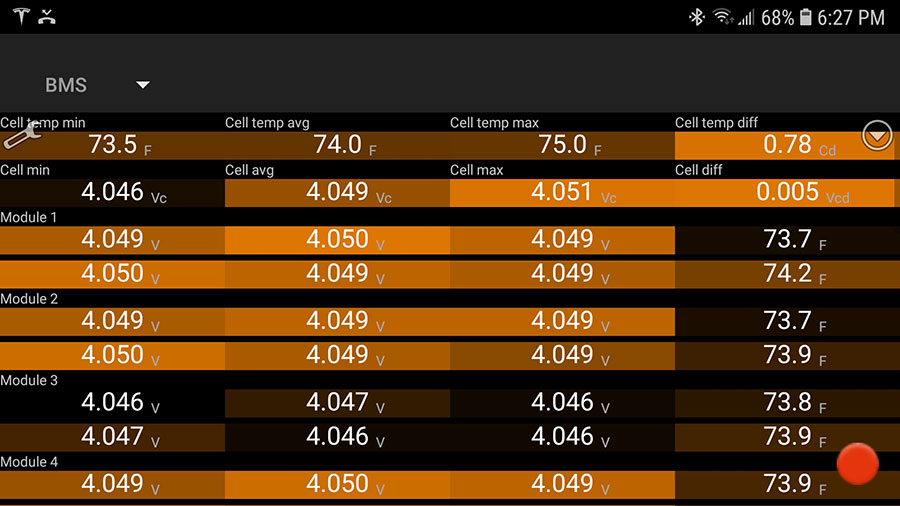
This example from the Scan My Tesla app first summarizes the battery data in the first two lines. Below that, it shows the battery module sub-group voltages, the temperatures, and highlights by color from the highest in bright amber to the lowest in black.
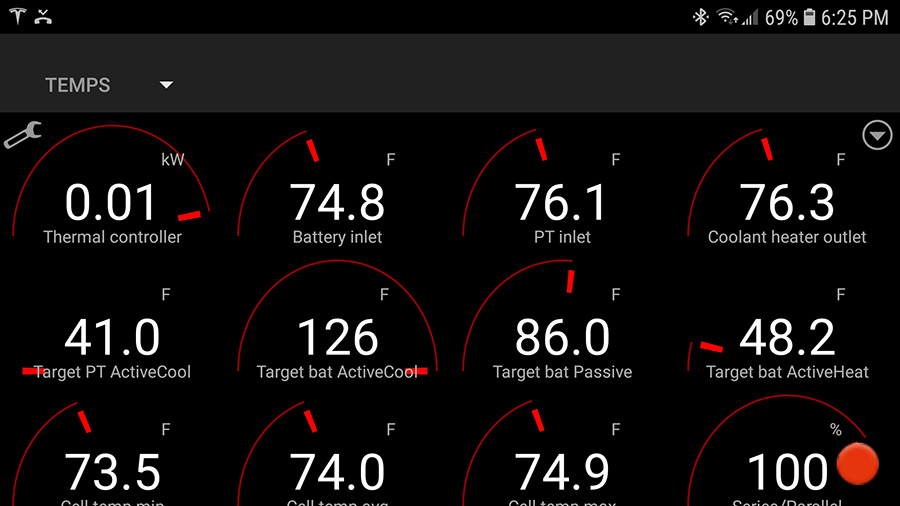
Most apps also allow you to view the data in different ways, such as direct values or analog gauges of different sizes. The second example shows a gauge view of temperatures.
Power and Security
Power Requirements
The OBD-II scanner when attached to the diagnostic port on the Model S and Model X (Dec-2020 or older) is on all the time. While on the Model 3 and Model Y and the S/X (manufactured in 2021 or later), it is only on when the vehicle is powered up. In either case, the power draw is minimal. In use, these units typically take under 1 W of power. Some scanners, like the recommended OBDLink, power down when not being used to a level of about 0.03 watts! If there are no other drains, and the battery had no internal leakage, an S60 would run about 7 years with the scanner fully powered on the entire time!
Security
I can’t say there are zero risks in using an OBD scanner, but they are quite small. In the case of the Model 3 and Model Y, with the device powered down, it eliminates the small external risk when parked.
On the Model S and Model X, the unit remains powered prior to 2021+ LR/Plaid. Since it is paired to your phone, it should not allow pairing to another device without physical access to the OBD scanner. Someone attempting to access the CAN bus through the adapter should be blocked. Even should they somehow break through pairing, and I’m not aware that this is possible, I don’t believe they can disable security, unlock the car, or drive off. They could read data like battery voltages, which is not too concerning.
There is one tiny concern with the OBD scanner powered. The scanner will emit its Bluetooth id. With a Bluetooth reader, you can see the ID. A very smart thief using a Bluetooth reader might think there is something valuable in the car and break in to get it. If they were that sophisticated, I’d expect they would see it’s just an OBD scanner and not be interested in breaking in.
Slightly unrelated, I’d remind you to not leave valuable electronics in your car when parked, especially if you leave them powered up or on standby. It’s so easy to use a reader and see a laptop or phone in a car by its Bluetooth signal.